How to Outline an Image in Photoshop Cc
15 Photoshop CC web and app design tips

Many of us who design for apps will have Photoshop CC in our arsenal of tools, and if you're anything like me you'll constantly be on the lookout for ways to work smarter. Today, I'd like to share a few of the workflow tips and tricks I've learned over the years.
01. Design quickly with Adobe Comp CC
Adobe Comp CC can be used as a way to quickly get started on a project, whether it's for UX/UI decisions, design or something else. Once you begin a project in Adobe Comp, you can set up a grid system and start easily adding design content, from type formatting using Typekit fonts to imagery and graphics. When you're done, you can take what you design in Adobe Comp CC right into Photoshop CC and continue working on it there.
02. Set up smarter
In order to streamline your workflow, the first place you should look is your set-up. For example, it's easy to alter your workspace to show more of the tools and panels you will need. Simply choose 'Window > Workspace > Graphic and Web'. This not only adds and organises the panels you will be using most often, but also reveals the drawing tools in the toolbar.
There are also some preferences you can take advantage of. Go to 'Photoshop CC > Preferences' or 'Edit > Preferences' , select the 'Units & Rulers' category, and set the ruler units to pixels (or whatever you need) for all new documents, no matter which profile (print, web etc.) has been used to create it. Next, go to 'Preferences > Performance > History & Cache > Web / UI Design'. Here, you can optimise history states for web and UI design, and gear cache levels towards smaller files with lots of layers.
- 85 brilliant Photoshop tutorials
One last time-saver. With no documents open in Photoshop, press the T key to select the Horizontal Type tool in the Tools panel. Then, go into the Options bar and change the font, font size, and so on – those formatting settings will become your new default for any new documents going forward.
03. Work faster with artboards
Ever since artboards were introduced in Photoshop, designing for the web or apps has got easier. Artboards allow you to design for several different device sizes and orientations in the same document, and make exporting faster. Here are a few tips:
- alt+click any 'plus' icon that appears around an artboard when the artboard is selected to duplicate it
- alt+drag the artboard to a new position to duplicate it
- Select an artboard using any method and hit ctrl+J to duplicate it
- Press alt and click an artboard in the Layers panel to fit that artboard to your screen
- To collapse all artboards at once, cmd+click on the arrow next to the artboard name in the Layers panel
- To quickly export artboards, choose 'File > Export > Quick Export as PNG'
04. Create a grid
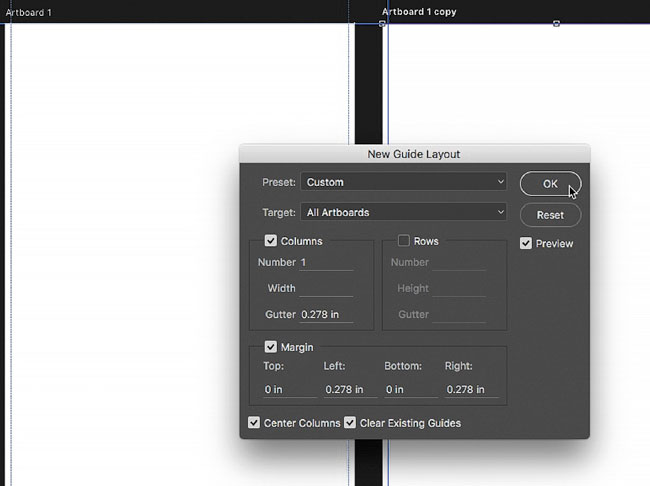
Most of us design to a grid of some sort when working in Photoshop. The latest versions of Photoshop CC make it easy to do this. With a document open, choose 'View > New Guide Layout'. In the dialog box that appears, you can set vertical and/or horizontal guides and apply that grid to selected artboards or all the artboards in a document.
05. Reuse custom shapes
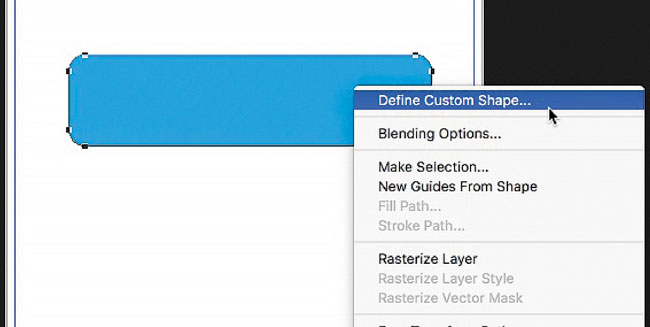
If you find yourself creating certain shapes often, you can easily save those shapes for reuse. Simply draw the shape, then select the Path Selection tool (black arrow), right-click the shape and choose 'Define Custom Shape'. This will save the shape with the rest of your custom shapes, which can be accessed by selecting the Custom Shape tool (under the Rectangle tool), or in the Shape menu under the Options bar.
06. Select using shortcuts
Anywhere you can save a bit of time in your workflow is gold, and selecting is one of those areas you can always learn more shortcuts for. Here are a few to remember:
- Using the Move tool, select the 'Auto Select Layer' option (or 'Auto Select Group') in the Options bar. This makes it easy to click on content in an artboard and select the layer
- Alternatively, leave Auto Select off and cmd+click content to temporarily turn it on
- Using the Move tool and with 'Auto Select Layer' on, shift+click multiple objects to select all of them
- On an artboard you can auto-select individual objects using the Move tool: with that layer selected, rightclick on the content and choose the parent group (or other) in the menu that appears
- If there isn't a lot of layered content, drag across content to select more than one layer
07. Tackle vector drawing
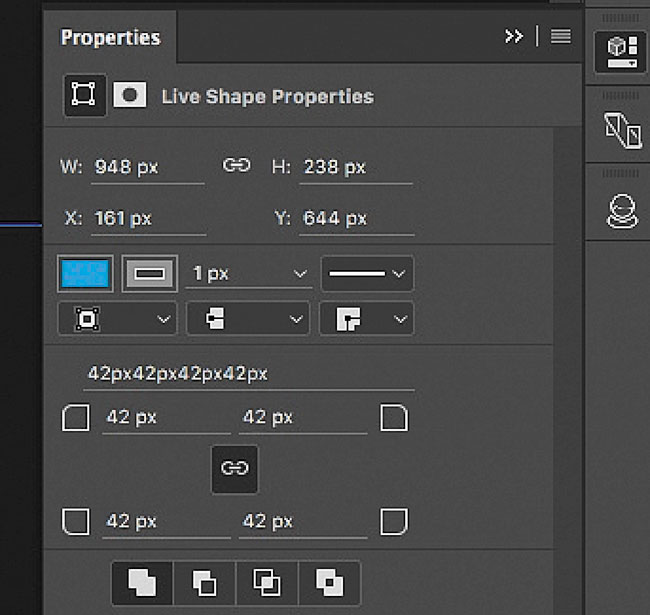
When designing for the web or apps, you will need to create vector artwork. This has got easier with every new version of Photoshop. A case in point is the overhaul of the Properties panel – where we can find the most widely used features when it comes to editing vector shapes in one place.
Here are a few simple drawing and editing tips:
- To drag a shape as you are drawing, press the Spacebar, drag the shape, then release the Spacebar and continue drawing
- To draw from the centre, press alt as you draw
- To constrain the proportions, press shift as you draw
- If you don't want shapes to snap to the artboard edges, you can toggle on and off Snap Bounds ('View > Snap To > Artboard Bounds')
- One final tip: Before drawing vector shapes, ensure the 'Snap Vector Tools and Transforms To Pixel Grid' option is selected ('Photoshop CC > Preferences > Tools or Edit > Preferences > Tools'). This ensures your vectors have crisp edges.
08. Copy shape formatting
We spend a fair amount of time formatting our designs. To save time, you can copy formatting from one shape to another. In the Layers panel, right-click a shape layer and choose 'Copy Shape Attributes' to copy all the attributes (stroke/fill). Then select more than one layer or layer group and right-click, choosing 'Paste Shape Attributes'. It's also possible to select a shape with the Path Selection tool – simply right-click on the shape, and choose 'Copy Fill' or 'Copy Complete Stroke' to copy and paste one or the other.
09. Save assets in CC Libraries
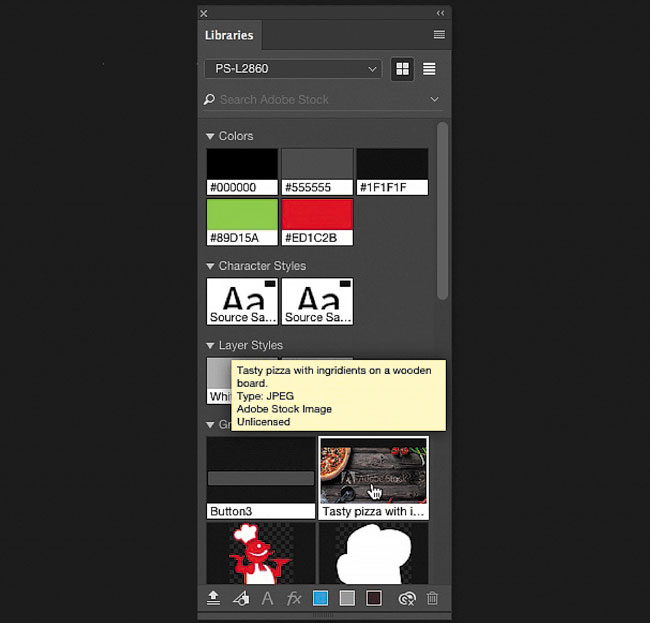
CC Libraries makes it easy to save formatting and assets (graphics, for instance) in the cloud, which you can then apply to design projects later. To reuse a saved graphic, simply drag it from the Libraries panel into your design. The content is linked to the asset in the Libraries panel (by default, but it can be embedded), allowing you to have consistent, shared elements like a header in a series of Photoshop files. If you update the Library asset, the asset will update across your designs.
10. Link smart objects
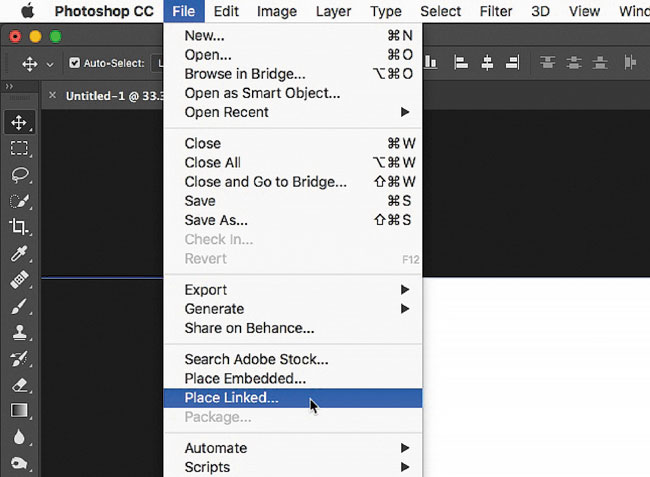
Linked smart objects allow you to place a source file across PSDs for non-destructive editing. Along with CC Libraries, this can really speed up your workflow and usually save on file size.
For instance, if you design for Retina (HiDPI) @1x, the content will eventually need to be scaled. Your original image content will need to be @2x or @3x in size. It can then be brought in as a smart object using 'File > Place Linked'. If you scale the design or export using methods like 'File > Export > Export As' , where you can change the Sizes (2x), Photoshop knows to use the original image data from the smart object.
11. Save layer styles
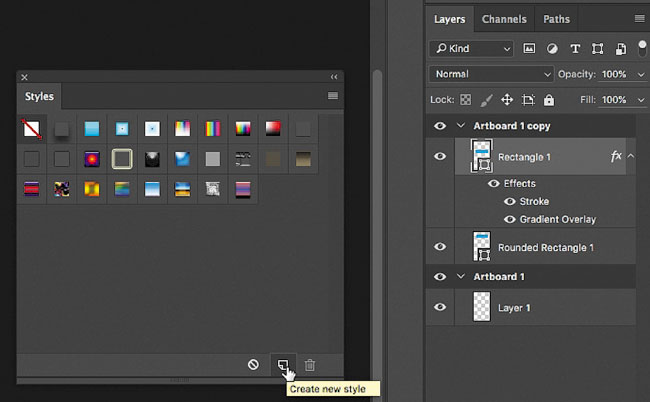
We apply layer styles to our content to add non-destructive styling like shadows, gradients and strokes. That means we most likely use a lot of the same styling across objects. You can save layer styles in the Styles panel to enable you to reapply them elsewhere. It's an easy way to maintain a consistent appearance and save time.
First apply layer styles to a layer or group (applying layer styles to a group is a fast way to apply the same styling to a bunch of objects). Then, select 'Window > Styles > Create New Style'. Give the style a name, adjust the settings and click OK. The style you created will now be available in the Styles panel.
12. Filter layers
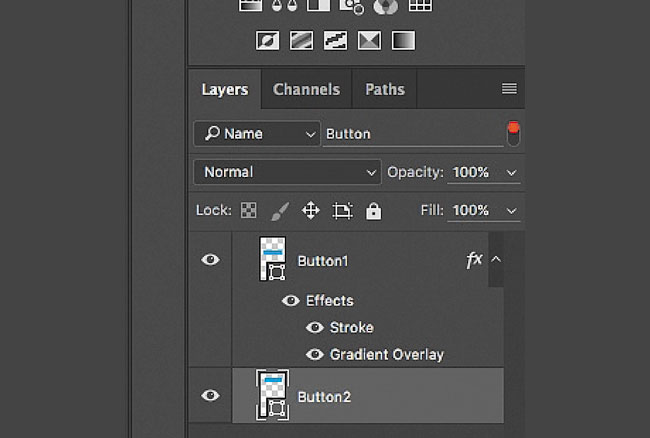
If you have a lot of layers in your web or app design files, it can become difficult to locate content in the Layers panel. Filtering layers is a great way to focus on specific layers. You can filter based on name, effects applied, artboards, and a lot more.
For instance, you can filter the list to see all your buttons by name ('button'). When you're finished, you can turn off filtering by toggling the red button at the top of the Layers panel, revealing all the layers again.
13. Copy out CSS
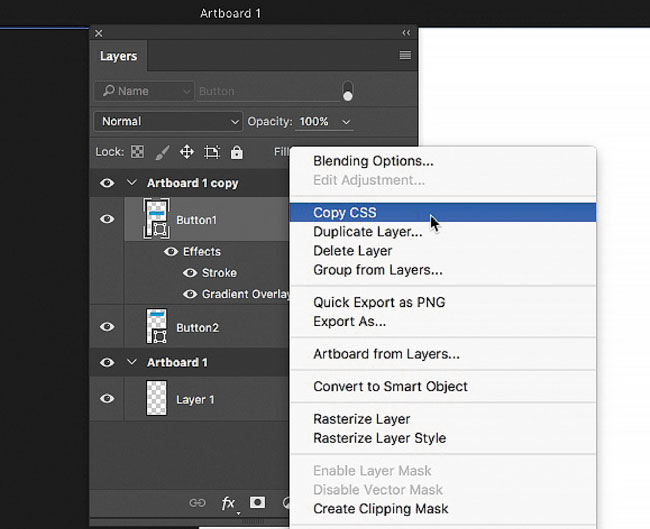
In the Layers panel, you can copy CSS that Photoshop generates from layer content. You can then use this code in your development process. Go to the Layers panel and select a layer or group, right-click one of the layers or groups and choose 'Copy CSS'. You can then paste the CSS into an editor.
14. Export assets
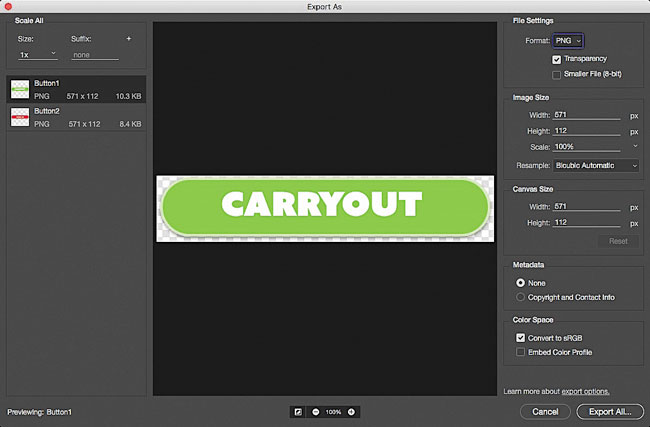
Being able to export assets for use in the development process is one of the reasons many web designers use an application like Photoshop. Here are a few fast ways to export assets:
- To export artboards as PNG, choose 'File > Export > Quick Export As PNG'. If you want to choose a different file format, you can choose 'File > Export > Export As'
- To change the 'Quick Export' to something other than PNG, open 'Photoshop CC > Preferences > Export or Edit > Preferences > Export') and change the export options
- To export anything as a PNG, select it in the Layers panel, right-click and choose 'Quick Export As PNG'
- To export anything, select it in the Layers panel, right-click and choose 'Quick Export As PNG' or 'Export As'. There you can also choose to export multiple sizes (@1x, @2x, @3x etc.)
15. Preview on a device
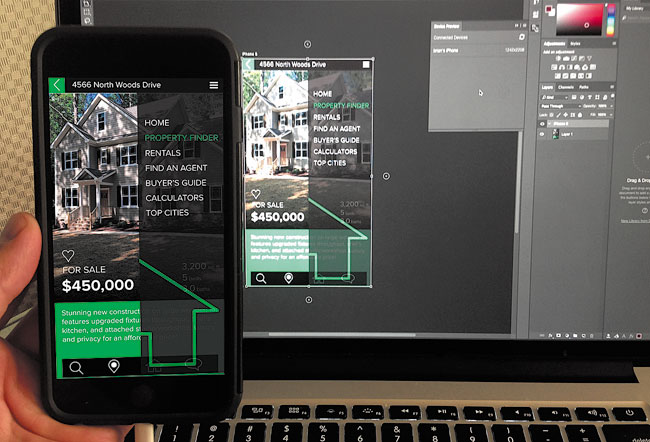
Using the Device Preview panel in Photoshop and the Adobe Preview CC mobile app on a device, you can preview your Photoshop designs on multiple iOS devices. Changes you make in Photoshop CC are even displayed in Preview CC in real time, as you make them. In the Device Preview panel, you can connect multiple iOS devices to Photoshop using USB or Wi-Fi, as long as they have the Adobe Preview CC mobile app installed.
We all occasionally get stuck in our ways and need a push to try newer features. Photoshop now delivers so many ways to save time when designing for the web or for apps. I hope you'll check out at least a few of the newer options that can help you streamline your design process.
This article originally appeared in net magazine issue 288; buy it here !
Related articles:
- Learn Adobe app basics with this Adobe Super Bundle
- What's new in Adobe Creative Cloud 2017
- How to design a typographical poster using Adobe InDesign
Brian is a web developer, teacher, and the author of 12 books. In addition to projects and training clients, Brian speaks regularly at conferences such as Adobe MAX.
Related articles
How to Outline an Image in Photoshop Cc
Source: https://www.creativebloq.com/advice/15-photoshop-cc-web-and-app-design-tips
0 Response to "How to Outline an Image in Photoshop Cc"
Post a Comment